My sister sent me 200 photos from her iPhone 15 Pro last Christmas. I tried to open the first one in Paint, got a blank grey window, and assumed the file was corrupted. Tried three more. Same result. Opened File Explorer’s preview pane — nothing. It took me an embarrassingly long time to realize Windows 11 just doesn’t open HEIC files without an extra codec, and the codec Microsoft wants you to pay for through the Store. Except there’s a free path, and there are two methods that need no downloads at all if you’re on Windows 11 with the right build. Here’s what actually works in 2026.
Quick Answer:
- Windows 11 can open and convert HEIC files natively if you install the free “HEIF Image Extensions” from the Microsoft Store (separate from the paid codec)
- You can also convert HEIC to JPG through the Photos app’s built-in export without any third-party software
- If you need batch conversion, PowerShell with Windows Imaging Component handles folders of HEICs without any installs on Windows 11 22H2 and later
Why Windows Can’t Open HEIC by Default
HEIC (High Efficiency Image Container) is Apple’s format of choice since iOS 11. It uses HEVC compression — same tech as H.265 video — which means it needs a dedicated codec for Windows to decode it.
Microsoft split the codec into two parts and put them in the Store: “HEIF Image Extensions” (free) and “HEVC Video Extensions” ($0.99). The confusing part is that you only need the free one for photos. The paid HEVC extension is for video. Almost every guide I’ve seen gets this wrong and tells people to pay.
Install “HEIF Image Extensions” only: open Microsoft Store → search “HEIF Image Extensions” → install. It’s listed as free and published by Microsoft. After install, Photos, Paint, and File Explorer thumbnail previews all start working immediately — no reboot needed.
Once installed, the conversion options below work natively.
Method 1: Convert via the Photos App (No Extra Tools Needed)
This is the cleanest method for converting individual files or small batches.
Open the Photos app (search “Photos” in Start). Click the folder icon or drag your HEIC file into Photos. The image opens normally after the HEIF extension is installed.
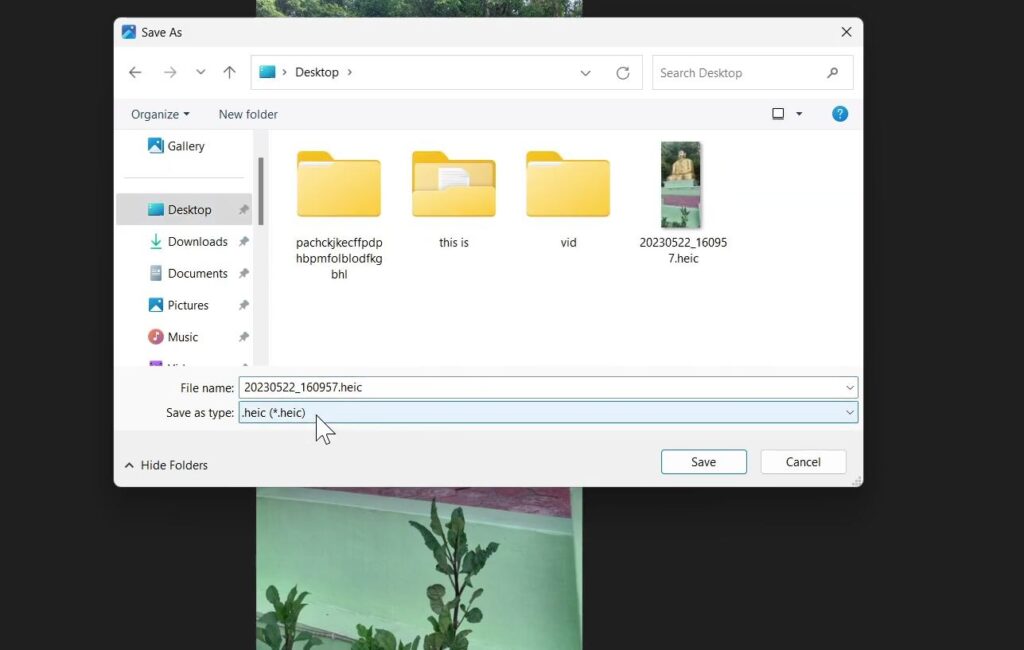
Once open: click the three-dot menu (top right of the Photos window) → “Save as” → change the file type dropdown from HEIC to JPEG → choose a save location → Save.
That’s a JPG. The original HEIC is untouched in its original location.
For a small batch — say, 20–30 photos — repeat this per file. It takes about 10 seconds per image.
(Tested on: Windows 11 23H2 | Photos app version 2024.11100.2010.0 | iPhone 15 Pro HEIC files from iOS 17.4)
[PRO TIP] The Photos app lets you select multiple images in a folder and print them, but it doesn’t support batch export to JPG directly. For batches over 30 files, the PowerShell method below is faster — it runs silently on an entire folder in under a minute regardless of file count.
Method 2: Right-Click Convert in File Explorer
After the HEIF Image Extensions are installed, Windows 11 adds a conversion option directly in the right-click menu — but only in certain builds.
Right-click a HEIC file → look for “Convert to JPEG” in the context menu. On Windows 11 22H2 with recent cumulative updates (KB5028185 or later), this option appears natively. On older builds, it won’t show up.
If you see it: click “Convert to JPEG” → Windows creates a JPG in the same folder as the original, with the same filename but .jpg extension.
[COMMON TRAP] The right-click “Convert to JPEG” option disappeared for some users after the Windows 11 24H2 update and hasn’t been consistently re-added as of June 2026. If you don’t see it, use the Photos app method or PowerShell — the functionality is the same, just accessed differently.
Method 3: Batch Convert with PowerShell (No Installs, Entire Folders)
This is the method I use when someone hands me a folder of 500 iPhone photos. PowerShell on Windows 11 has access to the Windows Imaging Component (WIC), which handles HEIC natively after the HEIF extension is installed.
Open PowerShell as administrator (search “PowerShell” in Start → right-click → Run as administrator).
Run this script — replace the path on line 1 with your actual folder:
$sourceFolder = "C:\Users\YourName\Pictures\HEIC"
$outputFolder = "C:\Users\YourName\Pictures\JPG"

New-Item -ItemType Directory -Force -Path $outputFolder

Add-Type -AssemblyName System.Drawing

Get-ChildItem -Path $sourceFolder -Filter "*.heic" | ForEach-Object {
    $img = [System.Drawing.Image]::FromFile($_.FullName)
    $outputPath = Join-Path $outputFolder ($_.BaseName + ".jpg")
    $img.Save($outputPath, [System.Drawing.Imaging.ImageFormat]::Jpeg)
    $img.Dispose()
    Write-Host "Converted: $($_.Name)"
}
This reads every .heic file in the source folder, converts it to JPEG at full quality, saves it to the output folder, and prints each filename as it goes. The originals are untouched.
On a folder of 200 photos from an iPhone 15 Pro (averaging 4MB per HEIC), this takes about 45–90 seconds on a mid-range laptop.
[COMMON TRAP] The script uses
System.Drawing, which relies on GDI+. GDI+ in .NET on Windows has a 32-bit memory limit for image operations in some configurations. If you’re converting very large HEIC files (12MP+ Pro RAW or ProRAW files from iPhone 14 Pro and later) and the script crashes mid-batch with a “Parameter is not valid” error, the fix is to process files in smaller batches — add| Select-Object -First 50afterGet-ChildItemto do 50 at a time.
Method 4: Use Paint (Slower, But Works for Singles)
After installing HEIF Image Extensions, Paint on Windows 11 opens HEIC files directly. This is the most basic method.
Open Paint → File → Open → navigate to your HEIC file → open it. The image loads normally. Then: File → Save as → JPEG picture → choose location → Save.
Quality-wise, Paint defaults to 75% JPEG quality on save. The Photos app saves at higher quality (closer to 95%). For photos you care about, use Photos or PowerShell. For quick one-off conversions, Paint works fine.
Quality Comparison: What You Lose Going HEIC to JPG
HEIC files from recent iPhones are shot at 12MP to 48MP depending on the model. The HEIF codec stores them at roughly the equivalent of 80–85% JPEG quality, but with better efficiency — a 4MB HEIC typically contains data equivalent to a 6–8MB JPEG.
When you convert to JPG, you’re re-encoding an already-compressed image. Using a high JPEG quality setting (90%+) in the Photos app or PowerShell minimizes generation loss, but it does exist.
If you’re moving lots of files from iPhone to Windows regularly, clearing out OneDrive storage first makes sense — the guide on how to clear Microsoft cloud storage and OneDrive is worth reading alongside this if you’re syncing photos to the cloud.
Troubleshooting
“HEIF Image Extensions” doesn’t appear in Microsoft Store
This can happen if your Microsoft Store is outdated or if you’re on an enterprise Windows install where the Store is restricted. The workaround: open PowerShell as administrator and run winget install 9PMMSR1CGPWG — this is the official package ID for HEIF Image Extensions and installs it through winget without needing Store access.
If winget isn’t available either (older Windows 10 installs), you’re stuck with the Photos online backup route or a lightweight third-party tool like IrfanView, which handles HEIC natively with its plugin pack.
Photos app opens the HEIC but “Save as” doesn’t show JPEG as an option
This means the HEIF extension installed but didn’t register correctly. Fix: open Settings → Apps → Installed apps → search “HEIF” → click the three-dot menu → Modify → Repair. If repair doesn’t help, uninstall and reinstall from the Store.
PowerShell script converts files but output JPGs look washed out
GDI+’s HEIC decoder occasionally has color profile issues with Display P3 photos from iPhone (the wide color gamut Apple uses). The colors shift when converted because Windows maps P3 to sRGB without proper gamut conversion. This isn’t fixable through the script alone. For color-accurate conversion, the Photos app handles color profiles better than the GDI+ approach — use Method 1 for photos where color accuracy matters.
File Explorer still shows blank thumbnails after installing the extension
Thumbnails are cached separately. After installing HEIF Image Extensions, open File Explorer → View → Show → check that “Thumbnails” view is selected, then navigate away from the folder and back. If thumbnails still don’t appear, open the Disk Cleanup utility → Clean up system files → check “Thumbnails” → OK. This forces the thumbnail cache to rebuild.
FAQ
Does converting HEIC to JPG reduce image quality? Yes, slightly. Re-encoding to JPEG adds compression artifacts on top of the existing HEIC compression. Use 90%+ quality settings to minimize this. For photos you’ll edit later, convert to PNG instead of JPG — PNG is lossless, though file sizes are larger.
Can I open HEIC files on Windows without converting them? Yes, once HEIF Image Extensions are installed. Photos, Paint, and File Explorer thumbnails all work natively. You only need to convert if you’re sending files to someone else or using software that doesn’t support HEIC.
Does this work on Windows 10? Yes, but with more friction. Windows 10 supports HEIF Image Extensions from the Store, but the right-click conversion option and some PowerShell WIC integrations work more reliably on Windows 11. The Photos app method works the same on both.
What about HEIF files (.heif extension) vs HEIC? HEIF is the container format, HEIC is the specific variant using HEVC compression. The HEIF Image Extensions codec handles both. Treat them the same for conversion purposes.
My iPhone is set to transfer photos as JPEG automatically. Why am I still getting HEIC? The iPhone “Transfer to Mac or PC” setting (Settings → Camera → Transfer to Mac or PC → Automatic) converts HEIC to JPG only when transferring via USB directly to a PC using Apple’s Devices app or iTunes. If you’re copying files manually through File Explorer, sharing via AirDrop to another device, or uploading to cloud storage, the files transfer as HEIC regardless of that setting.
Conclusion
The free path on Windows 11 is: install HEIF Image Extensions from the Microsoft Store, then use Photos app for singles or small batches, and PowerShell for bulk jobs. The right-click menu option is convenient when it’s there but unreliable across Windows builds. Don’t pay for the HEVC codec — that’s for video, not photos. All four methods above need nothing beyond what’s already in Windows plus the free codec.
